Timecard Editing
Editing Punches
Currently, two versions of Timecards Editing are available on Timedox. Below we will demonstrate how to utilize both versions.

This article will explore various methods for adjusting punches, including adding a punch, deleting a punch, modifying a punch, and adding an absence reason. If you are using the Cloud Lite System and do not notice any employees listed on the account, click here for the step by step instruction on transferring your data online.
 If you encounter challenges editing reports due to punches being reordered inaccurately, it might be attributed to account configurations. This issue commonly arises when there are employees working beyond midnight. In such cases, enabling Night Mode is necessary. To gain a deeper understanding of the configuration and instructions on adjusting this setting, please refer to this article.
If you are editing punches for overnight employees, Timecards Editing (Classic) must be used.
Editing Timecards (Classic)
1. Log-in to us.timedox.com with Administrator credentials.
2. Locate ‘Timecards’, in the top menu bar, and select ‘Timecards Editing’ from the drop-down menu.
3. Double-click on a user name or ID number to review their reports.
4. Double-click on the date that you want to edit.
Adding a Punch
1. Select the 'Add New' button in the top left corner.
2. In the 'In' and 'Out' column you will notice 2 drop-down menus.
The first menu is for the hour and the second menu is for the minute.
3. After inputting the accurate time, click the checkmark to apply and save the alterations. A green highlight will appear, signaling that the changes have been successfully saved.
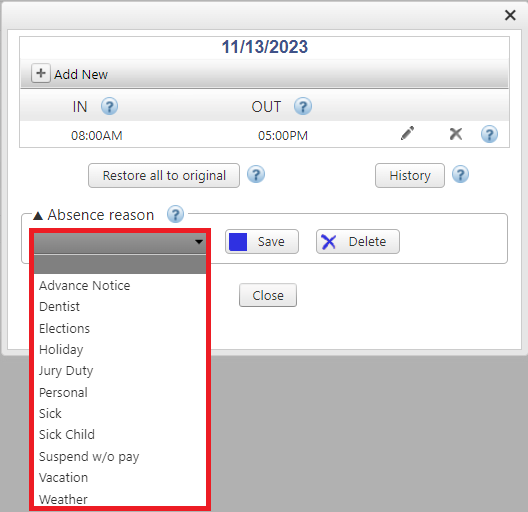
4. If needed, click 'Absence Reason' to display a list to choose from. Once selected, click 'Save'
4. Select 'Close' to review the report.
If you're in need of an Absence Reason that is not listed, please contact support at 470-554-7334 Ext 4 or support@timedox.us
Deleting Punches
1. Select the X next to the pencil tool to delete the entire row.

If the data was registered at the device the data can always be recovered by selecting the button that reads 'Restore all to Original'.
Otherwise, you can click 'History' to view a list of changes that were made to this timecard.
Otherwise, you can click 'History' to view a list of changes that were made to this timecard.
Modifying a Punch
1. Select the pencil tool next to the 'Out' punch
2. Access the drop-down menus corresponding to the punch you wish to modify.
3. Select the checkmark to save the changes once the data is modified.
4. Select 'Close'
Recovering Data
You may be curious about the possibility of recovering deleted data. If the recorded punches on the account were made at the device, it is indeed possible to restore the data.
1. To recover lost data, select the button that reads 'Restore all to Original'.
Editing Timecards (New Page)
This version can be significantly quicker and is excellent for use when you need to modify multiple timecards.
1. Log-in to us.timedox.com with Administrator credentials.
2. Locate ‘Timecards’, in the top menu bar, and select ‘Timecard Editing (New Page)’ from the drop-down menu.
Alternatively, you can access it by choosing 'Edit Timecards' from your Dashboard.
3. Double-click on a user name or ID number to review their reports.
4. Double-click on the punch you would like to edit and type the corrected time.

When inputting the punches, you have the option to enter them in either 12-hour or 24-hour (military time) format. If opting for the 12-hour format, it is suggested you specify 'AM' or 'PM'.
6. You can add 'IN'/'OUT' columns as needed by clicking
7. To remove the punches entered, click the 'X' next to the time you'd like to delete. You can also undo the entire line by simply clicking the
8. To input an absence reason, just click on the corresponding line in the 'Absence' column and select from the available options.
9. Once you're done making edits, be sure to select 'Save.'
Should you require more information or have questions about Timecards Editing or any other feature offered by Timedox, please don't hesitate to get in touch with our support team.
Should you require more information or have questions about Timecards Editing or any other feature offered by Timedox, please don't hesitate to get in touch with our support team.
Related Articles
Clocking Report
The "Clocking Report" uses a color-coding system to provide additional details on individual punches. With this type of report you can: See the Employee's GPS location at time of punch in/out*; Determine which method was used to report in/out for ...Enabling Time Rounding
Enabling Time Rounding will round the employee punches to the nearest quarter-hour within the 7-minute increment. 1. Log in to Timedox using Administrator credentials. 2. Select the "hamburger menu" icon in the top right corner on any page of the ...Setting the Time & Date (CloudLite)
If you are a Cloud Pro subscriber, the time & date settings for your device are managed on the us.timedox.com website. Click here for instructions. If you have Cloud Lite/Plus account, the time and date are configured directly on your device. Some ...Setting/Changing the Day Start Time
The "Day start" time indicates when your system switches to the next calendar day. In most cases, this can be left at midnight. In rare instances, Companies with varied shifts throughout the day and night may need to adjust this time in order to ...Saving Reports
Exporting Reports The following instructions will guide you on saving reports to your computer. In the event that the dates are incorrect when viewing/exporting the reports, please see this article on configuring your pay period. 1. Log-in to ...